Add Custom Questions for the Submission Summary Group Detail
About this task
The External ID of the S1M custom question must match exactly
with the External ID specified in Author Portal.
Procedure
-
Select .
-
In the Detail Group Properties table, locate the
Submission Summary row, which should be the first row, and click the plus icon
under the Add Questions column.
-
In the Question Name field, enter
Submission Summary
								label
.
-
In the Question Text field, enter
Submission
								Summary
.
-
Select Label as the Answer
Type.
-
Click Save to save your updates.
A new window will open, where you can add and configure questions for
the Submission Summary.
-
In the new window, under Add Questions & Answers, do
the following:
-
Set
Question Name : to Internal Use Only
label.
-
Set
Question Text: to Internal Use
Only.
-
Set
Answer Type: to Label.
-
Click Save.
The new window will refresh. The Internal Use Only
label question is now added to the Detail Group
Properties table in this window.
-
Set
Question Name : to Submission Summary
label.
-
Set
Question Text: to Submission Summary
Only.
-
Set
Answer Type: to Label.
-
Click Save.
The new window will refresh. The Submission Summary label
question is now added to the Detail Group
Properties table in this window.
-
Set
Question Name : to Submission Summary
text.
-
Set
Question Text: to Submission
Summary.
-
Set
Answer Type: to Textarea.
-
Check the include in advanced manuscript search
box.
-
Scroll down to the Answers table.
-
In the first row, under Answer Name, enter
text.
-
Under External Id, enter
REX-CQ-SSu-01x.
You can use any
External ID you need, as long as it is unique, but it is recommended that you use a
naming convention for troubleshooting, such as the
following:
REX-[Configuration Area]-[Detail Group]-[Sequence
					Number]
For example, the external ID of the first custom question
in the list of questions related to plagiarism can be formed as
follows:
REX-CQ-PL-01Additionally, specifically for custom questions, you can add an additional
identifier at the end of the external ID to indicate the type of response, for
example:
Important: External IDs that are referenced in Author Portal must be entered
exactly as they appear in ScholarOne. For example, if the ScholarOne External ID
is REX-CQ-PL-01-Y, then in Author Portal it must be entered exactly the
same, and not REX-CQ-PL-01-y, with a lower case
y.
-
Check the box under the Active column.
-
Click Save.
The new window will refresh. The Submission Summary
text question is now added to the Detail Group
Properties table in this window.
-
Click Close Window to close the window and
return to the ScholarOne Custom Questions configuration page.
-
In the Detail Group Properties table, for the
Submission Summary row, click the icon in the
Configure Layout column.
A new window will open where you can configure the layout for the
Submission Summary.
-
In the new window, do the following:
-
Under Create table to control the layout of the custom
field., set
Number Rows: to
1 and Number Columns to
3.
-
Click Create Table.
A table will appear above Create table to control the
layout of the custom field.
-
In the Table boder: field, click
on.
-
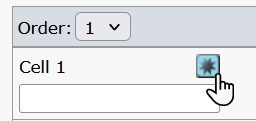
In the new table, click the Cell Properties icon for Cell 1.
A Cell Properties panel will be displayed
to the right of the new table. If you cannot see the Cell
Properties panel, try maximizing the window.
-
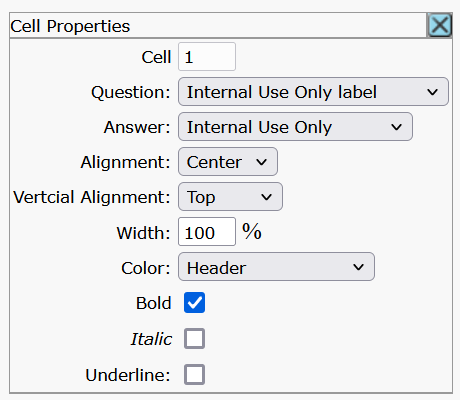
In the Cell Properties panel, ensure
Cell is set to 1.
-
Set
Question: to Internal Use Only
label.
-
Set
Answer: to Internal Use
Only.
-
Set
Alignment: to Center.
-
Set
Color: to Header.
-
Check the Bold box.
-
In the new table, click the Cell Properties icon for Cell 2.
-
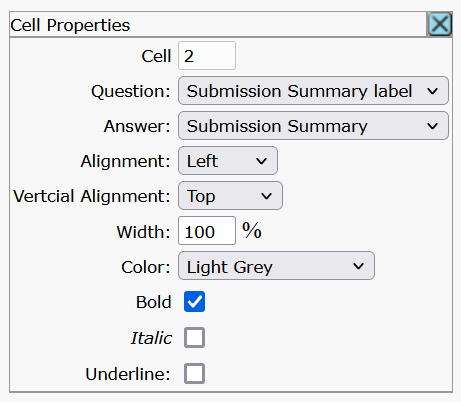
In the Cell Properties panel, ensure
Cell is set to 2.
-
Set
Question: to Submission Summary
label.
-
Set
Answer: to Submission
Summary.
-
Set
Alignment: to Left.
-
Set
Color: to Light Grey.
-
Check the Bold box.
-
In the new table, click the Cell Properties icon for Cell 3.
-
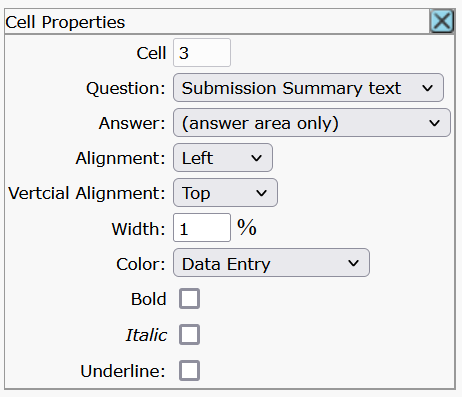
In the Cell Properties panel, ensure
Cell is set to 3.
-
Set
Question: to Submission Summary
text.
-
Set
Answer: to (answer area
only).
-
Set
Alignment: to Left.
-
Set
Width: to 1%.
-
Set
Color: to Data Entry.
-
Click X to close the Cell
Properties panel.
-
Cick the icon to save the cell properties.
-
Close the new window.
Documentation Feedback
We value your feedback!
Please use this form to send us your comments and suggestions regarding the ReX Submission documentation. For other enquiries, please visit the help page.


